Installing the Fence: Basics
A woven wire fence installed with T-posts would consist of 6 basic materials
- T-posts
- Wood “anchor” posts (4×4 is probably adequate, we use 6×6 because we had some)
- Concrete for anchor posts
- Wire fencing
- Clips to attach fencing to T-posts
- U staples or nails to attach fencing to anchor posts
Spacing:
- Anchor posts should be at the corners or ends of the fence, and every 30- 50 feet throughout the length of it.
- T-posts should be every 10 feet.
Depth:
- Anchor posts should be treated like any wood post and go down at least 2.5 feet for a 5 foot tall fence. (The bigger the post, the deeper you want to set it.)
- T-posts have “blades” on them that should be buried, again, at least 2 feet for a 5 foot fence I would think.
Tools:
- Post-hole digger for the anchor posts
- A good tape to measure everything out
- String line & level to keep you straight
- T-post “banger” – or “post driver” as they are more appropriately referred to.
- Heavy-duty pliers to attach the clips
- Hammer for the U nails
- pulleys and a board to stretch the fence
How We Did It
1.) We set the corner posts and marked the T-post and anchor post locations, then put the anchors in first since it took the most time. (String line, dig hole, level post, concrete in place, rinse and repeat til finished.) The anchor posts were set on the “inside” of the fence, so the wire would go on the outside and around the corners.
2.) T-posts were installed by banging them into the ground with the banger. Post driver. Whatever. We aligned them so the fencing would be on the “inside” of the pasture and the T-posts on the outside. (Opposite of the anchor posts.)
3.) The fencing gets rolled out. If you happen to be the person holding the other end of the wire, don’t let go. Or you’ll be chasing a rapidly re-rolling bit of fence for then next 150 feet. Not that I’d know from experience, but I suspect it could happen.
4.) Once the “frame” of posts was up (the T-posts being significantly faster to install than the anchor posts, but also significantly harder to keep level) we stretched the fence. Conventional wisdom says to attach the fence to one corner/anchor post with U staples/nails, and then put a temporary post in the ground beyond the other corner or anchor post, which you will attach the pulleys to in order to stretch the fence.
We thought that seemed like a lot of extra effort, so we decided to use the truck as our stretching post instead.

What? It worked.
Note: We didn’t stretch the fence by backing the truck up or anything, we used the winch on the pulley for that. We basically just stuck a 2×3 through the holes of the fence, which is probably the less-than-appropriate way to do that, then wrapped a chain around it and attached it to the pulley (which was attached to the cable hook on the front of the truck.)
I hear the fence should be stretched until the little V shaped crimps in it become about 1/3 straighter. I have no idea how a person would eyeball that, so we went with the “straight, taught, looks good” method.
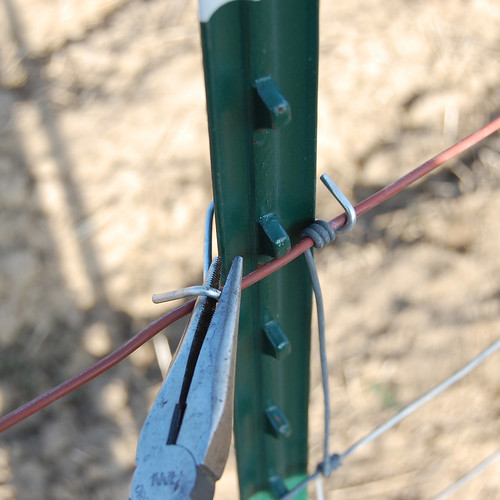
5.) Once the wire was stretched we started at one end and began attaching the clips. For a 32″ fence, we used 3 clips per T-post. 5 clips per post is recommended for a higher fence.
The clips work like this
Don’t knock the gloves. I lost my work pair somewhere and this was what was available to me to keep my fingers from freezing and breaking into a thousand pieces.
Wrap…
One side has a longer end, and if you bend at the kink everything with tighten up nicely.
Finish it off with another wrap and tighten down the other side of the clip.
Looks easy. Gets to be a pain in the ass after you do it seven hundred times. Also, make sure the top of the fence is over one of those handy notches on the post.
6.) Enjoy life.


